BakingChristmasRecipes

Yule Log (Buche de Noel)

12 - 14 mins Cook
Scroll to recipe

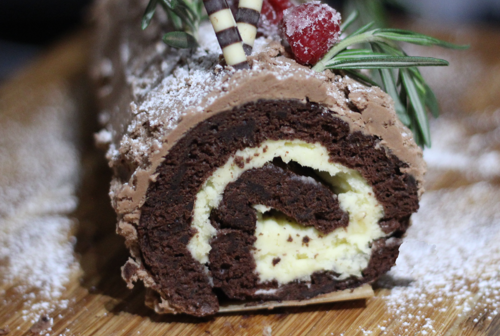
Yule log is a Christmassy swiss roll, packed full of chocolatey goodness. With a thick creamy filling, a beautiful chocolate cake and a rich buttercream coating, it’s a perfect Christmas dessert for those with a sweet tooth!

Enjoy and share your creations with us by tagging us on Social Media using #GemBakes. Find us on InstagramFacebook and Youtube!

Share
Yule Log (Buche de Noel)

Yule Log (Buche de Noel)

agnesgempackfoods-ie
prep time
90 mins
cooking time
12 - 14 mins
servings
8

Equipment

  • stand mixer

  • large mixing bowls

  • small bowl

  • lined sheet pan

  • tea towel

Ingredients

  • For the Cake:

  • 6 Eggs (Yolks and whites seperated)

  • 120g Gem Plain Flour

  • 60g Cocoa Powder

  • 180g Gem Granulated Sugar

  • Pinch of Salt

  • Icing Sugar for dusting

  • Splash of Milk (Optional)

  • For the Filling:

  • 250ml Double Cream

  • 60g Gem Icing Sugar

  • 2 tsp Powdered Gelatine

  • 2 tsp Vanilla Extract

  • For The Buttercream:

  • 100g Gem Milk Chocolate Chips

  • 200g Butter (Room Temp)

  • 400g Gem Icing Sugar

  • 1-2 tbsp Cocoa Powder (Optional)

  • For Decorating:

  • 50g Raspberries

  • 2 tbsp Gem Caster Sugar

  • Chocolate Shavings

  • Sprigs of fresh Rosemary

Instructions

1
Preheat the oven to 175°C Fan, 195°C.
2
In the bowl of a stand mixer, add the 6 egg whites and whip until soft peaks. Add in 60g of Gem Granulated Sugar and whip until stiff peaks. Set to the side.
3
In a large mixing bowl, beat the egg yolks until thickened using an electric mixer. Add in 120g of Gem Granulated Sugar and continue to beat. In a separate bowl, sift the flour, cocoa powder and salt together. Add the egg yolk mixture to the dry ingredients and mix them together. If the mix looks too dry, add a splash of milk.
4
Fold the egg whites into the other mixture in three batches so to not knock all the air out at once, taking care not to over-mix. Once you see the air bubbles popping on the surface, it is time to stop.
5
Spoon the mix into a grease and lined sheet pan. Gently smooth out using an offset spatula to ensure everything is evenly spread. Bake for 12 - 14 minutes. You'll know it's done when the cake is slowly springing back from a touch. Leave to cool slightly, until the cake starts to come away from the sides of the pan.
6
While the cake is in the oven, dust a lined tea towel with a layer of icing sugar. Once the cake has cooled slightly, tightly wrap it up in the towel. Place back on the tray and leave to cool in a cold place. Do not cool it in the fridge as this will chill the cake too quickly and cause cracks and breaks.
7
While the cake is cooling, bloom the gelatine in 2 tsp of water for 5 - 10 minutes. Once bloomed, give it a 10-seconds blast in the microwave, until runny. Be sure not to leave too long.
8
Beat all of the other filling ingredients together in a mixing bowl. Strain the gelatine in and continue to beat until creamy filling forms. The gelatine will stabilise the cream and keep its shape in the cake.
9
Once the cake has cooled in the towel, unwrap it and spread the filling layer evenly, leaving a small gap between the edges. Roll the cake up around the towel. Place in the fridge, ensuring the cake seam is facing down, for at least one hour but up to overnight.
10
For the buttercream, melt the Gem Chocolate Chips in a heat proof bowl over boiling water. If you want a darker buttercream, use dark chocolate chips. Once it's completely melted, leave to cool for a few minutes. Cream the butter and sugar together until a light buttercream has formed. Slowly add in the cooled chocolate and beat again. Add cocoa powder to the mix if you want a more intense flavour.
11
Take the cake out from the fridge, unwrap from the towel and brush off the excess icing sugar. Spoon on the buttercream and spread out using an offset spatula until everything is fully covered.
12
Dust the cake with icing sugar, and add lightly sugared raspberries, chocolate shavings, and fresh rosemary for decoration!

Leave a Reply

Your email address will not be published. Required fields are marked *